Let's be real for a moment. A clean makeup sponge isn't just a nice-to-have; it's a non-negotiable for healthy skin and getting that flawless blend you're after.
A quick daily rinse with some gentle soap and water is all it takes to get rid of fresh makeup and stop bacteria from setting up camp. Think of this simple routine as the foundation (pun intended) of a more sustainable, eco-conscious beauty practice.
Why a Clean Makeup Sponge Matters
Letting your makeup sponge go unwashed is more than just a little gross—it directly impacts your skin's health and how your makeup performs. Every time you dab that soft, porous tool on your face, it soaks up not just leftover foundation but also your skin's natural oils, dead skin cells, and whatever else is floating around in the air.
It quickly becomes a perfect breeding ground for bacteria. For anyone who cares about how their products perform and the health of our planet, keeping your tools clean is a crucial part of the daily ritual.
The Impact on Your Skin and Makeup
When you skip cleaning, you're essentially just dabbing a cocktail of old gunk and microbes back onto your fresh, clean skin. This can lead to clogged pores, breakouts, and general skin irritation. It's an even bigger deal if you have sensitive or acne-prone skin. In fact, some studies show that up to 80% of users who don't clean their tools regularly may see breakouts directly linked to them.
Beyond the hygiene factor, a dirty sponge just doesn't work well. A sponge already saturated with old product can't pick up and blend new makeup smoothly. You'll probably notice a streaky or patchy application and end up using way more product than you need to. Keeping your tools in top shape means your favorite vegan products, like our Fungdation, will also last you much longer.
"A pristine sponge is the secret to a seamless, airbrushed finish. It ensures the product melts into your skin, rather than sitting on top of a layer of old makeup."
People are catching on. The global market for makeup sponge cleaners is booming, expected to hit USD 100.37 million as more of us realize just how important proper tool hygiene is.
A Sustainable Beauty Practice
Committing to cleaning your sponge fits perfectly with a sustainable, zero-waste mindset. When you take care of your tools, they last longer, which means you replace them less often. That’s good for your wallet and even better for reducing waste.
By making a quick daily cleanse part of your routine, you're embracing a practice that’s kinder to both your skin and the planet. This simple habit makes sure that every time you learn how to apply foundation with a sponge, you get the beautiful, consistent results you deserve.
The Two-Minute Rinse for Daily Upkeep
Think of a quick daily rinse as hitting the reset button on your makeup sponge. Honestly, you wouldn't re-wear sweaty gym clothes, so why would you reuse a sponge loaded with yesterday’s foundation, concealer, and skin oils?
Making a two-minute cleanse part of your daily routine is the single best habit for keeping your sponge in top shape. It stops product buildup in its tracks, prevents nasty bacteria from throwing a party in there, and makes sure you get that flawless, smooth application every single time. This isn't about a deep, heavy-duty scrub; it's a simple ritual that keeps the gunk from setting in and makes your weekly deep clean so much easier.
Your Simple Daily Cleaning Method
First things first, get your sponge completely saturated with lukewarm water. You’ll know it’s ready when it puffs up to its full, glorious size. A word of caution: stay away from hot water. High temperatures can break down the sponge's material over time, causing it to lose that soft, bouncy texture we all love.
Once it's soaked, add a little dollop of a gentle, plant-based soap directly onto the sponge. A mild castile soap is fantastic for this, but your favorite sulfate-free facial cleanser works just as well. The goal is to use something effective enough to dissolve oils and pigments without leaving behind any harsh residue that could irritate your skin later.
Perfecting the Lather and Squeeze
Now for the most satisfying part. Gently massage the soap into the sponge with your fingertips. You want to work up a really good lather, making sure you get the cleanser into every nook and cranny, especially the spots where makeup tends to build up.
For an even better lather, I like to use the palm of my hand as a washing board.
- Press and squeeze the sponge repeatedly against your palm.
- Whatever you do, avoid twisting or wringing it out. That's a fast track to creating tiny tears and ruining its delicate structure.
- Keep this gentle squeezing motion going under running lukewarm water.
You’ll see the water go from murky and foundation-colored to crystal clear. That’s your cue that the sponge is officially clean.
The key is to keep squeezing until the water runs completely clear. If you still spot any color, it just means there’s a little product still hiding inside. A few extra squeezes are all it takes to get it truly fresh.
Once you see clear water, give the sponge one last, firm squeeze to wring out as much excess water as you can. And that's it! This simple two-minute habit keeps your tool hygienic and ready to deliver that seamless blend you’re after, day after day.
Mastering the Weekly Deep Clean
A quick daily rinse is great for maintenance, but a weekly deep clean is the non-negotiable ritual that truly resets your sponge. Think of it as a spa day for your hardest-working tool. This is your chance to dissolve all that stubborn, set-in foundation and restore its soft, bouncy texture.
This deep clean is what gets rid of the deep-seated oils and pigments a quick rinse just can't touch. It’s the key to making sure your makeup applies flawlessly, without the streaks and patchiness that a dirty, saturated sponge creates. Plus, it’s a must for keeping your skin happy and getting the most out of your vegan beauty products.
The Double Cleanse Method for Stubborn Makeup
Ever dealt with a sponge that’s stained with long-wear or oil-based foundation? Sometimes, a simple soap-and-water scrub just doesn't cut it. That's where the double cleanse technique comes in, a trick I borrowed from skincare. It's my absolute go-to for sponges that look hopelessly caked with product.
The process starts with an oil-based cleanser or even just a bit of natural oil, like coconut or olive.
First, work a small amount of oil directly into your dry sponge. Gently massage it in, really focusing on the most stained spots. You'll see the oil start to break down and lift the oil-based pigments right out of the sponge. Let it sit for a minute to really work its magic.
Once the oil has done the heavy lifting, you follow up with your regular gentle, water-based cleanser to wash everything away. This two-step process is a game-changer for dissolving even the most stubborn makeup, leaving your sponge looking almost new without any harsh scrubbing.
This simple infographic breaks down the core steps that are part of any good sponge cleaning routine, whether it's a quick daily rinse or a full-on deep clean.
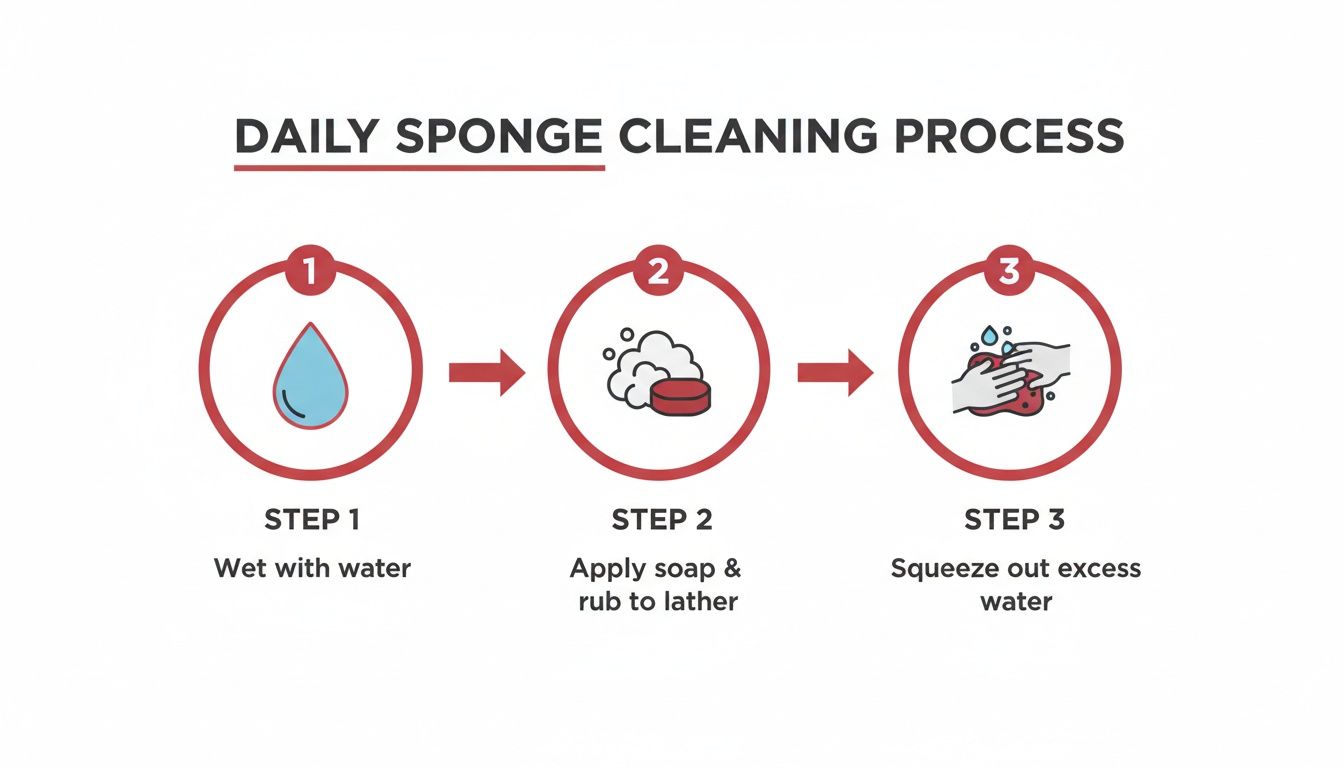
Getting these three actions down—wetting, lathering, and squeezing—is the foundation of good sponge hygiene.
A Simple and Sustainable DIY Cleaning Solution
You really don't need to buy a fancy, dedicated cleaner. My favorite deep-cleaning method uses simple, vegan household ingredients that are super effective and much better for the planet.
- Liquid Castile Soap: A gentle, plant-based soap that cuts through grime without any harsh chemicals.
- Warm Water: Just enough to fill a small bowl for a good soak.
- Tea Tree Oil (Optional): Add just one or two drops for its natural antibacterial properties.
All you do is combine a squirt of castile soap with warm water in a bowl and let your sponge soak for about 30 minutes. This gives the soap plenty of time to penetrate the sponge and loosen up all that dried-on product. Afterward, just gently squeeze and rinse it under running water until it runs clear.
It's a sustainable approach that keeps your beauty routine clean and simple, which is a philosophy that totally aligns with our guide on how to sanitize makeup brushes using similarly gentle methods.
It’s no surprise that the market for sponge cleaners has exploded, jumping from $38.763 million to $52 million in just four years as more people look for better hygiene solutions. A popular hack that's been making the rounds is microwaving a wet, soapy sponge in a cup of water for one minute. This can kill up to 99% of bacteria and might even extend your sponge's life.
Getting Your Sponge Dry and Stored the Right Way
So you've given your sponge a thorough wash, and it's sparkling clean. High five! But your job isn't quite done yet. What you do next is just as critical for keeping that sponge hygienic and your skin happy.
Tossing a damp sponge into a dark, sealed makeup bag is like rolling out a welcome mat for mildew and bacteria. That enclosed, moist environment is exactly where microbes love to party. Getting the drying process right is non-negotiable for making sure your sponge performs beautifully and lasts as long as it should.
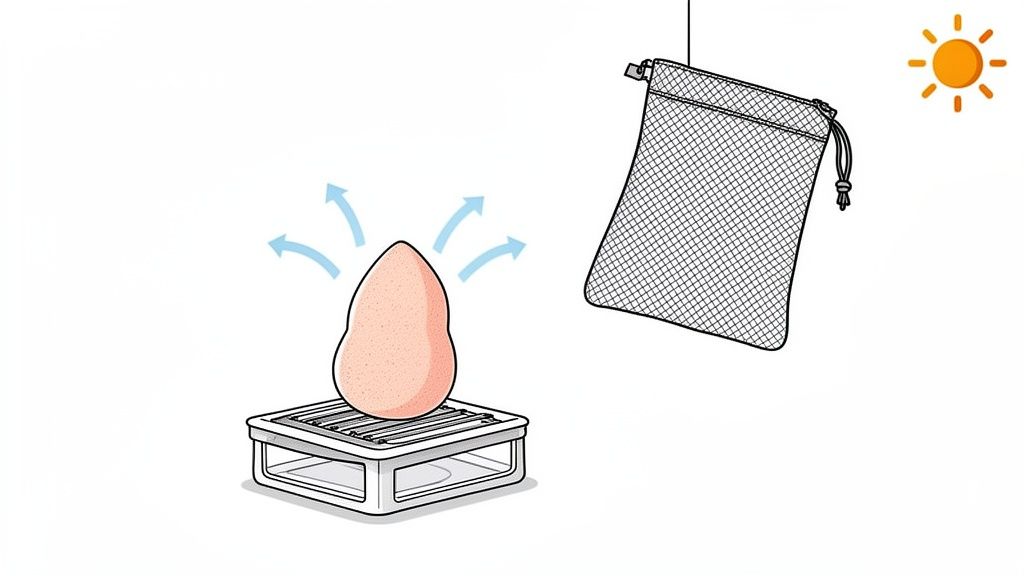
Let It Breathe: Why Air Circulation Is Everything
If you remember one thing, let it be this: air circulation. Your sponge needs to breathe from all sides to dry out completely. If you just leave it sitting on a flat bathroom counter, the bottom part stays damp, trapping moisture and basically creating a petri dish. Gross.
This is exactly why a little sponge stand is such a game-changer. They’re usually made from metal or silicone and just elevate the sponge so air can flow all the way around it. It’s a tiny purchase that pays off big time in keeping things sanitary.
Don't have a stand? The plastic egg it came in often has ventilation holes and can work in a pinch. Just don't let it sit in a puddle of water!
Smart, Sustainable Storage That Isn’t a Plastic Bag
Once your sponge is completely bone-dry, you need a place to keep it. The goal is to protect it from dust, pet hair, and general bathroom grime without suffocating it. And again, a sealed plastic bag is not the answer.
Instead, think breathable and eco-friendly.
- A Small Mesh or Cotton Bag: These are perfect. The fabric protects your sponge but still allows air to circulate, preventing any lingering moisture from causing trouble. I toss mine in one for travel all the time.
- A Ventilated Sponge Case: Lots of brands are now making travel cases with little holes or slits specifically for sponges. They keep its shape from getting squished in your bag while still letting it breathe.
A well-ventilated spot is truly your sponge’s best friend. I keep mine on a little wire stand on my vanity, far away from shower steam. It's a simple habit that ensures it's always dry, fresh, and ready for a flawless application.
Nailing these drying and storage habits completes the cleaning cycle. It’s the final step in ensuring your sponge remains a safe, effective tool in your vegan beauty routine—and it lines up perfectly with a zero-plastic, waste-conscious mindset.
Solving Common Sponge Problems
Even with a solid cleaning routine, you might still run into some frustrating issues. We've all been there: a stubborn foundation stain that refuses to budge or a faint, musty smell that makes you question your efforts. Don't worry, most of these common sponge problems have a simple, sustainable fix.Knowing how to troubleshoot these little annoyances is key. It keeps your tools in top condition and helps you avoid replacing them prematurely—a win for both your wallet and a zero-waste beauty philosophy.
Tackling Tough Foundation Stains
Some pigments, especially in long-wear foundations, are literally designed to cling. And boy, do they do a great job of it on your sponge. When a regular wash just isn’t cutting it, it's time for a spot treatment. My favorite trick is to use a natural oil to break down the makeup before washing.
It’s surprisingly simple. Just work a few drops of coconut or olive oil directly into the stained area of your dry sponge. Gently massage it in with your fingertips, and you'll actually see the oil start to dissolve the pigment right away.
After a minute, wash the sponge like you normally would with a gentle soap. This gets rid of both the oil and all that loosened makeup. This little pre-treatment step often handles even the most stubborn spots. Of course, sometimes a streaky application isn't the sponge's fault; you might want to learn more about how to fix cakey foundation to get to the root of the problem.
Neutralizing Unpleasant Odors
If your sponge starts to smell a bit funky or musty, that’s a clear sign of lingering bacteria. Gross, I know. A simple soap wash might not be enough to completely kick the odor.
For this, a diluted white vinegar soak is incredibly effective. Just mix one part white vinegar with ten parts warm water in a small bowl. Submerge your sponge and let it soak for about 30 minutes. The acetic acid in the vinegar is a natural disinfectant that kills odor-causing bacteria without any harsh chemicals.
After the soak, just give it a thorough rinse and a final wash with soap to remove any leftover vinegar scent.
It's kind of shocking, but traditional sponges can trap a scary amount of bacteria. Unclean ones can host thousands of times more germs than a toilet seat after just one use. Yikes. Rinsing with a 1:10 vinegar solution weekly can kill 99.9% of bacteria without harsh chemicals, preventing issues that lead to skin irritation. You can discover more insights about the move toward cleaner beauty tools on futuremarketinsights.com.
Got Questions About Cleaning Your Makeup Sponge? We’ve Got Answers.
Even the best tutorials can leave you with a few lingering questions. When it comes to your skin’s health and getting that perfect makeup finish, you deserve clear, straightforward answers. Let's tackle some of the most common things people wonder about when it comes to keeping their makeup sponges in top shape.
How Often Should I Really Be Cleaning My Sponge?
This is the big one, and the answer is simpler than you might think. For the absolute best hygiene and a flawless application every time, you’ll want to give your sponge a quick rinse after every single use. Think of it this way: it stops fresh makeup from drying and settling deep into the sponge, which makes your weekly deep clean a whole lot easier.
Speaking of which, a really thorough, deep clean should be a non-negotiable part of your routine at least once a week. If your skin is sensitive or acne-prone, or if you’re a fan of heavy, long-wear foundations, you might even bump that up to twice a week. It’s all about consistency—it keeps bacteria away from your skin and ensures your foundation glides on smoothly, without any streaks from old, caked-on product.
Is It Okay to Use Dish Soap or Shampoo?
It’s a tempting thought, especially in a pinch, but using household soaps on your beauty tools isn’t your best move. Most dish soaps are packed with harsh detergents designed to cut through grease on last night’s dinner plates—not something you want anywhere near your face. Over time, those same chemicals can break down the delicate material of your sponge, causing it to tear or lose that soft, bouncy feel.
And what about shampoo? While it definitely seems gentler, many shampoos and conditioners contain silicones, oils, or heavy conditioning agents. These can leave a sneaky film on your sponge that messes with how your makeup applies, leading to a patchy, uneven finish.
The best (and safest) choice is always a gentle, fragrance-free liquid soap. A natural castile soap is a fantastic, eco-friendly option. You could also use a dedicated sponge cleanser or even a simple, sulfate-free face wash you already have on hand. These are all designed to be effective but mild, protecting both your sponge and your skin.
When Is It Officially Time for a New Sponge?
Even a sponge you’ve loved and cared for has a lifespan. As a general rule of thumb, you should plan to replace your makeup sponge every three to six months. But honestly, it’s more important to watch for the signs of wear and tear than to stick to a strict calendar date.
It’s definitely time for a new one if you notice any of these things:
- Stubborn stains that just won’t budge, no matter how many times you deep clean.
- A funky smell that lingers even after a good disinfecting soak.
- The texture feels off—maybe it’s dense, rough, or has lost its signature bounce.
- Visible damage like little rips, tears, or pieces starting to flake off.
And the absolute, non-negotiable dealbreaker? Any tiny black or green spots. That’s mold, and the sponge needs to be tossed immediately. Using a compromised tool isn’t just bad for your makeup look; it can be genuinely harmful to your skin.
Can I Dispose of My Old Sponge in an Eco-Friendly Way?
This is such a great question for anyone trying to live more sustainably. Most of the makeup sponges you see in stores are made from polyurethane foam, a type of plastic that isn't biodegradable. Unfortunately, that means it will just sit in a landfill.
The good news is that the beauty world is slowly catching on. Some innovative brands are creating sponges from bio-based materials like plant starches or bamboo powder. If your sponge is specifically labeled as compostable, you can go ahead and toss it in your home compost bin.
For the standard polyurethane sponges, it’s a bit trickier. Your best bet is to look for specialized recycling programs that accept beauty and cosmetic waste. But the most sustainable practice of all? Just take excellent care of the sponge you have to make it last as long as possible, which means you'll be replacing it less often.
Ready to elevate your sustainable beauty routine? The Axiology Fungdation and multi-use Balmies apply flawlessly with a clean, damp sponge, giving you a radiant finish that's kind to your skin and the planet. Discover our collection of vegan, cruelty-free, and zero-plastic makeup at https://www.axiologybeauty.com.